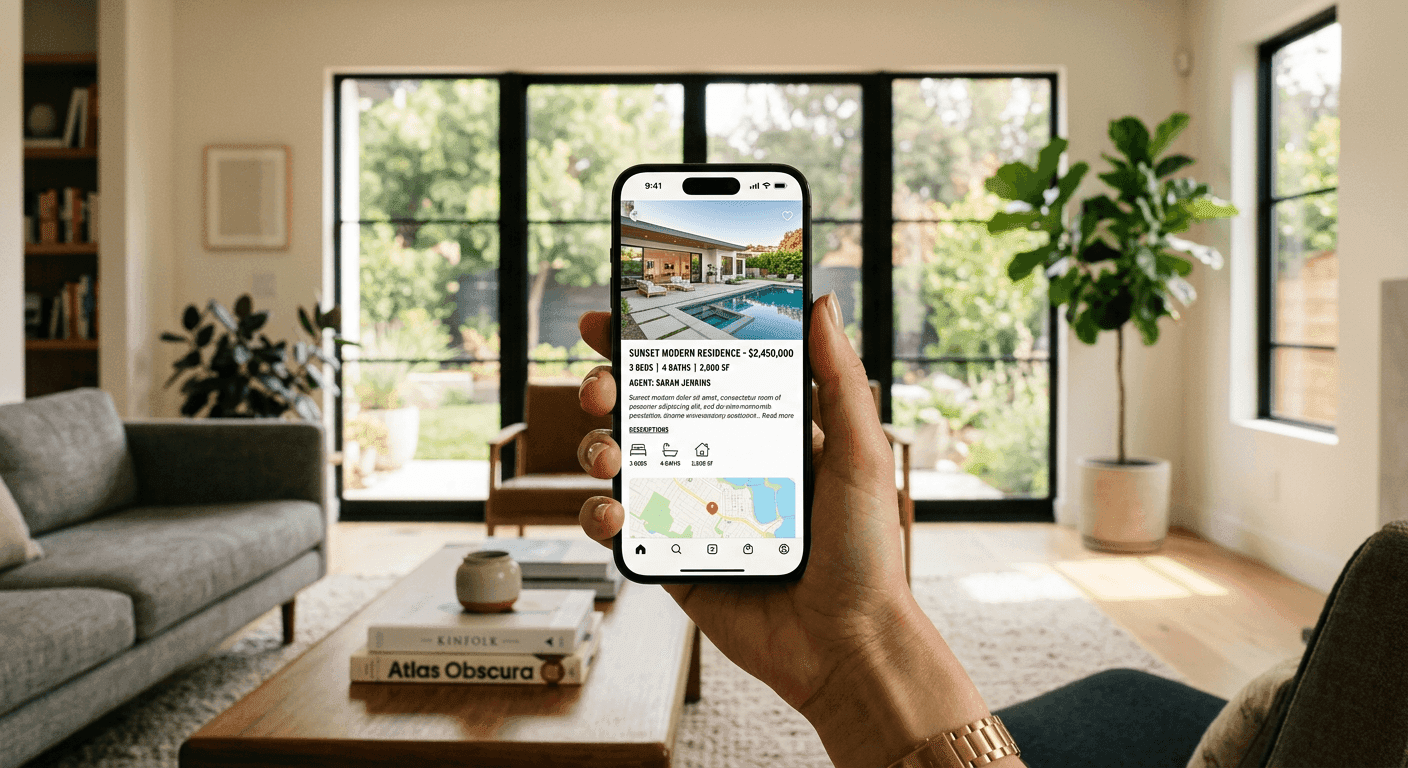
Use AI to Direct Better Real Estate Listing Photos
Directing real estate listing photos well is not about making a home look flawless. It is about helping buyers see the property clearly, accurately, and confidently online. According to the National Association of REALTORS, 96% of recent buyers used online tools during their home search, so your listing photos often create the first showing opportunity or the first reason to move on. This guide shows agents how to direct photographers more effectively, use AI real estate photo tips responsibly, improve image consistency, avoid misleading edits, and build a practical photo workflow from listing prep through final gallery approval.
Note that laws, MLS rules, advertising requirements, commission practices, and disclosure standards vary by state and market. This article does not provide legal, tax, or financial advice. When you are unsure, consult your broker, MLS, legal counsel, or state regulator.
Why Photo Direction Matters More Than Ever
Online presentation is now one of the strongest first impressions in residential real estate. Because nearly all recent buyers rely on digital tools during the search, your gallery functions as both a marketing asset and a consumer information source.
The financial stakes are real. A Redfin analysis found that homes with professional listing photos tended to sell faster and at higher prices than homes marketed with amateur images. Research from Zillow has likewise shown that listings with high-quality media receive more views and saves, which keeps buyers engaged longer.
AI does not replace strong photography, seller preparation, or agent judgment. Instead, it can help you plan, organize, review, and standardize the visual story of a home. Photo direction belongs inside listing prep and pricing strategy, because better images support buyer understanding, showing activity, and seller confidence at launch.
Keep the ethical frame simple. Photos should improve clarity, not create fiction. AI editing will not guarantee a higher price or a faster sale, and promising that would set the wrong expectation with sellers.
What This Means in a Listing Workflow
AI-assisted photography direction means using AI-supported prompts, checklists, image review, and editing guidelines to help create a better listing photo set. It is a planning and quality-control aid, not a marketing decision-maker.
Used well, it can support several stages of your process:
- Pre-shoot planning
- Room-by-room preparation
- Shot list development
- Image curation
- Gallery sequencing
- Basic quality control
- Consistency checks across the MLS, portals, flyers, email, and social media
NAR's guidance on AI in real estate frames these tools as assistive. REALTORS and licensees remain responsible for compliance and truthfulness in every output, so these tools should help your workflow rather than make unsupervised marketing or compliance decisions.
AI-Assisted Planning vs. AI-Assisted Editing
It helps to separate two different uses of AI. Planning happens before and around the shoot. Editing happens to the actual image files.
On the planning side, AI can:
- Generate a room-by-room prep checklist
- Identify must-have shots based on property type
- Create notes for the photographer about selling points, awkward spaces, renovations, views, and likely buyer objections
- Suggest a logical gallery sequence
On the editing side, AI can:
- Correct brightness, contrast, color balance, and sharpness
- Straighten vertical lines
- Reduce lens distortion
- Improve consistency across the gallery
- Help label virtually staged or materially altered images when required
A responsible photo editing workflow clearly separates cosmetic corrections from edits that could change how buyers perceive condition, size, features, or surroundings. The first category is generally defensible. The second category needs care, disclosure, or both.
What Still Requires Human Judgment
Professional photographers bring composition, lighting, lens choice, room flow, and perspective control that AI cannot replicate on its own. Agents and brokers remain responsible for advertising accuracy, MLS compliance, and truthful representation.
NAR's Code of Ethics, specifically Article 12, requires REALTORS to present a true picture in their advertising, and that obligation extends to photographs and internet content. NAR's AI guidance reinforces the same point. AI can improve efficiency, but the licensee is accountable for the final marketing output.
MLS rules also vary significantly. Some MLSs have specific requirements about altered images, virtual staging, required exterior photos, watermarks, text overlays, and photo ownership. The Real Estate Standards Organization has emphasized consistent media labeling, such as flagging virtually staged photos, to support transparency in data exchange. Always confirm what your local MLS allows before you publish.
Where AI Can Improve Listing Photos Without Creating Risk
Use AI first for clarity, consistency, and organization. Low-risk uses generally make an image closer to what the eye would reasonably see in person, rather than changing property facts.
The best image enhancement is subtle, consistent, and easy to defend if a buyer, broker, MLS, or regulator asks what was changed. If you cannot comfortably explain an edit, reconsider it.
Image Enhancement and Consistency
NAR's imagery ethics guidance treats certain enhancements as acceptable as long as they do not hide material defects or materially change appearance. Generally lower-risk adjustments include:
- Brightness correction
- Minor color correction
- Contrast balancing
- Sharpness improvements
- Lens distortion correction
- Vertical line correction
- Window exposure balancing
- Consistent white balance from room to room
Consistency matters because a gallery with mismatched color temperatures, overly dark rooms, or uneven editing can reduce buyer confidence. Zillow research suggests that consistent, high-quality images correlate with longer engagement, which helps buyers understand layout and condition.
Avoid over-editing. Watch for heavy HDR, unrealistic sky replacement, artificially bright rooms, oversaturated landscaping, or floors and cabinets that appear to be a different color than they are in person. Fannie Mae's Selling Guide reminds us that appraisers and underwriters review listing photos, so cosmetic improvements should never obscure actual conditions.
Shot Selection and Sequencing
AI can review a set of proofs and help you identify the best hero image options, duplicate or redundant shots, missing rooms or features, images with distortion or distracting clutter, and weak transitions in the gallery flow.
A logical gallery flow helps buyers follow the home:
- Strongest exterior or most compelling hero image, depending on MLS rules and listing strategy
- Entry or main living area
- Kitchen
- Dining and living spaces
- Primary bedroom and bath
- Secondary bedrooms and baths
- Office, flex, storage, laundry, garage, basement, or bonus spaces
- Outdoor living, yard, views, amenities
- Detail shots only when they add value
A Redfin analysis found that more photos help online performance up to a point, with the front exterior, kitchen, and main living areas carrying the most weight. The first several images are especially important for engagement, so put your strongest compliant shots first.
Pre-Shoot Preparation
AI can turn seller instructions into a simple, customized checklist. NAR's seller guidance highlights decluttering, cleaning, and light staging as steps that help rooms read as spacious and functional.
AI can suggest which rooms need the most prep, which items to remove or minimize, which features to highlight, and which buyer objections to address visually. The key principle is that prep beats editing. It is safer to move trash bins before the shoot than to digitally remove them later.
Where Agents Need to Be Careful
AI makes realistic-looking edits easy to produce, which raises the risk of misleading buyers. Ask one core question before any edit: would a buyer be surprised or feel misled when they see the property in person?
MLS rules, state advertising laws, brokerage policy, Fair Housing rules, and professional ethics may all apply at once. NAR's legal guidance warns that altering photos to hide material facts can be deceptive and expose licensees to ethics complaints and legal liability.
Misrepresentation and Material Facts
Material facts include property conditions, features, defects, views, surroundings, size, location factors, or other details that could influence a buyer's decision. Risky edits include:
- Removing cracks, stains, water damage, roof damage, or foundation indicators
- Removing nearby power lines, buildings, roads, or obstructions
- Making a small room appear substantially larger
- Changing flooring, countertops, cabinetry, paint, or fixtures without disclosure
- Adding views, landscaping, furniture, pools, fireplaces, or finishes that do not exist
This ties directly to NAR's true picture standard and to state rules against deceptive or misleading advertising. State real estate commissions, such as the Texas Real Estate Commission, prohibit advertising that is misleading or deceptive, which can include photos that hide defects or materially change appearance. AI should never be used to disguise a property's actual condition.
Virtual Staging and Disclosure
Virtual staging digitally adds furniture, decor, or design elements to help buyers understand scale or use. Virtual renovation is different and higher risk, because it digitally changes finishes, fixtures, flooring, landscaping, or other property features.
Follow a few best practices:
- Label virtually staged images clearly where required or prudent
- Keep an unstaged or original version available when appropriate
- Do not make rooms appear larger than they are
- Do not cover or hide defects
- Do not imply renovations are complete when they are not
Some states and MLSs have specific virtual staging rules. The New York Department of State has issued guidance reminding licensees that virtually staged photos are permissible only when they do not misrepresent conditions and are clearly disclosed as virtually staged.
Fair Housing and Image Bias
Fair Housing risk can arise from images as well as words. HUD's advertising guidance explains that even without explicit language, photos depicting only certain demographics enjoying a property or neighborhood can be read as indicating a preference or limitation.
Be careful with:
- AI-generated people in listing images
- Demographic assumptions in lifestyle imagery
- Neighborhood photos that imply exclusion or preference
- Ideal buyer visuals that could create discriminatory messaging
Advertising cannot indicate a preference, limitation, or discrimination based on protected classes. NAR's fair housing resources urge licensees to review marketing materials, including photos, for unintentional bias. Review any AI-generated or AI-edited visuals through a Fair Housing lens before publishing.
A Practical Pre-Shoot Checklist for Agents
Adapt this checklist by property type, price point, seller capacity, and local market expectations. The goal is to fix physical presentation before relying on AI photo editing.
Exterior and Curb Appeal
NAR's curb appeal guidance treats lawns, landscaping, and entryways as major drivers of buyer first impressions. Before photo day:
- Mow the lawn, trim shrubs, edge walkways, and remove weeds
- Sweep the porch, driveway, patio, deck, and walkways
- Remove vehicles from the driveway and front curb when possible
- Hide trash bins, hoses, tools, toys, seasonal decorations, and delivery boxes
- Clean or repaint the front door if needed
- Replace burned-out exterior bulbs
- Open patio umbrellas only if clean and in good condition
- Arrange outdoor furniture neatly
- Remove pool equipment, dead plants, and excessive yard clutter
- Ask the photographer about the best time of day for the front elevation, backyard, views, or eastern and western exposure
You can use AI to build a customized curb appeal checklist from listing notes and seller constraints, and to compare exterior images for consistency. Do not use it to remove permanent surroundings or defects.
Interior Readiness
NAR staging research reports that 58% of buyers' agents said staging affected most buyers' view of the home, and 81% said it made visualizing the property easier. Prepare the interior with these steps:
- Turn on all lights and use a consistent color temperature where possible
- Open blinds or curtains unless privacy, glare, or view issues suggest otherwise
- Clear kitchen counters except for a few intentional items
- Remove refrigerator magnets, paperwork, pet bowls, trash cans, cleaning supplies, and personal hygiene items
- Declutter coffee tables, nightstands, shelves, and bathroom counters
- Make beds tightly and remove excess pillows or laundry
- Close toilet lids
- Hide cords where practical
- Remove visible pet items and personal photos when appropriate
- Organize closets only if they will be photographed
- Clean mirrors, windows, stainless steel, floors, and shower glass
- Confirm that any room marketed as a bedroom meets local and MLS expectations
Use AI to generate seller-friendly photo reminders by room, and to flag clutter or inconsistent lighting during image review. Prioritize physical correction before the shoot.
Photo Direction Notes
Document a clear set of must-have shots: front exterior, entry, main living area, kitchen, dining area, primary suite, secondary bedrooms, bathrooms, laundry, garage or parking, outdoor living, yard, views, and community amenities where allowed.
Then list property-specific features worth capturing, such as a renovated kitchen or bath, a new roof, HVAC, windows, flooring, or appliances, built-ins, a fireplace, a home office, a finished basement, an ADU or guest suite, storage, energy-efficient features, and accessibility features.
Finally, note buyer objections to address visually, including small rooms, an unusual layout, limited storage, a sloped yard, a busy street, low natural light, shared walls, or older finishes. Visual context can reduce surprises, but you should never hide legitimate drawbacks.
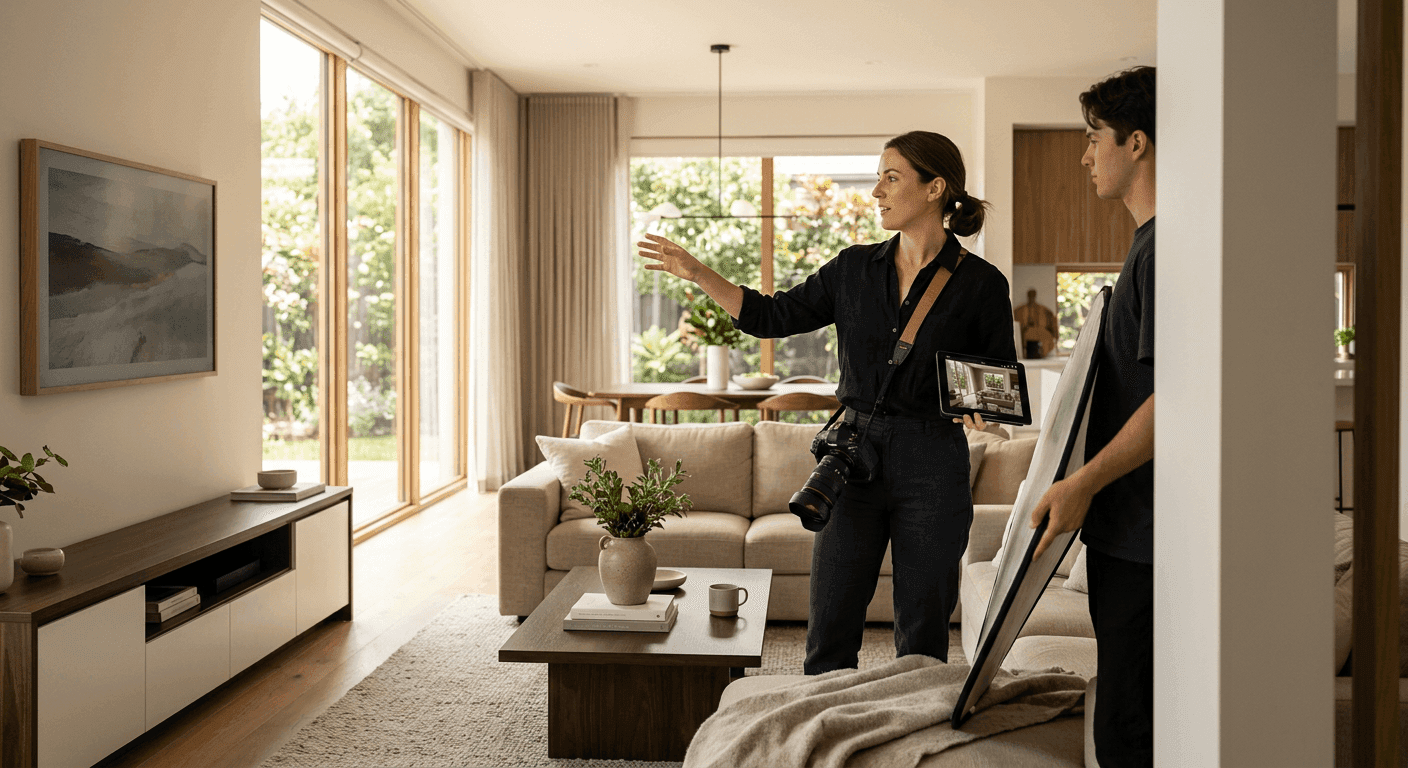
How to Brief Your Photographer or Media Provider
A strong written brief prevents missed features, poor sequencing, and unnecessary reshoots. Share strategy, property facts, and editing boundaries in writing.
Property Positioning
Include the listing price range and competitive set, the top three to five selling points, known buyer concerns, and any neighborhood or community amenities that can be photographed under MLS and HOA rules.
Be careful with target buyer language. Frame around property features and likely use cases, not protected-class assumptions. Note whether the strategy emphasizes:
- Move-in readiness
- Renovation potential
- Outdoor living
- Location convenience
- Luxury finishes
- Space and storage
- Investment or rental potential, where appropriate and compliant
Zillow research indicates that buyers respond strongly to lifestyle-relevant spaces such as kitchens, outdoor living areas, and home offices, so brief your photographer on which compliant angles best fit the home.
Shot Priorities
Offer the photographer a clear hierarchy. Hero image options might include the front exterior, kitchen, a view, the great room, outdoor living, or an architectural detail.
Flow shots help connect spaces: entry into the living area, living to kitchen, kitchen to dining, primary bedroom to bath, and indoor-outdoor connections. Feature shots cover appliances, countertops, the fireplace, built-ins, storage, the pantry, closet systems, garage workspace, and the patio, deck, pool, garden, or balcony.
For required MLS coverage, include the front exterior when required, all major rooms, and an accurate representation of property type and condition. Many MLSs require at least one front-exterior photo and encourage coverage of all living areas, bedrooms, and baths. Remind the photographer to avoid overly wide angles that make rooms feel misleadingly large.
AI Editing Boundaries
Spell out acceptable edits in the brief: exposure correction, color balance, lens correction, straightening, minor temporary clutter removal where allowed by MLS and broker policy, and consistency adjustments.
List edits that require approval, such as sky replacement, lawn greening, object removal, virtual staging, adding fire in a fireplace, TV screen replacement, and window view enhancement.
Then mark the prohibited or high-risk edits clearly:
- Removing defects
- Removing permanent structures or obstructions
- Changing flooring, finishes, or fixtures
- Adding nonexistent views
- Making rooms appear larger
- Altering property boundaries or surroundings
Require delivery of original files or unedited reference images when possible, and specify how altered images should be labeled and stored. NAR's legal guidance on digital manipulation supports drawing these lines in advance.
Smart Ways to Use AI After the Shoot
Post-shoot AI is useful for review, not just editing. NAR's AI guidance frames these tools as ways to handle repetitive tasks so you can focus on fiduciary duties and careful image review. Compare edited images against your property knowledge and original files, and make final decisions yourself or with your broker.
Quality Control Review
Run each gallery through a focused check:
- Are vertical lines straight without distorting the room?
- Do colors match the actual paint, flooring, cabinets, and countertops?
- Are windows, views, and exterior surroundings accurate?
- Is the room size visually fair?
- Are any defects hidden or softened too aggressively?
- Are skies, lawns, fireplaces, pools, and lighting realistic?
- Are any rooms or expected exterior angles missing?
- Are virtually staged images labeled correctly?
- Are community amenity photos allowed and accurately identified?
- Are people, license plates, personal documents, or privacy concerns visible?
- Does the gallery match MLS rules and brokerage standards?
NAR's imagery ethics guidance encourages brokers to build review processes that catch over-editing, distortion, or omitted defects before publication. AI can support that review, but it cannot replace it.
Listing Gallery Order
Start with the most compelling compliant image and prioritize the first five to ten photos, since buyers often make quick decisions online. Tell a logical visual story:
- Exterior or hero image
- Entry and main living areas
- Kitchen and dining
- Primary suite
- Secondary bedrooms and baths
- Flex spaces, storage, garage, laundry
- Outdoor living, yard, views, amenities
- Supporting details
Avoid leading with minor detail shots unless the detail is a major selling point. Remove duplicates that slow down the buyer's understanding, and use captions when permitted to clarify upgrades, room function, or virtual staging.
Marketing Repurposing
Use the approved image set consistently across the MLS, IDX display, brokerage website, listing portals, email campaigns, flyers, social media, listing presentations, and open house materials. NAR marketing resources encourage a consistent set of visuals to reinforce recognition and trust.
Keep edits and image order consistent enough to avoid confusion. Do not run a more heavily edited version on social media than what appears in the MLS if the difference could mislead buyers. Maintain records of final approved images, originals, staged versions, captions, and seller approvals where appropriate.
Examples of Acceptable vs. Risky Edits
These are general risk categories, not legal advice. Always follow your MLS, brokerage policy, state law, and applicable advertising rules.
Generally Acceptable Edits
NAR's technology and ethics materials compare minor digital enhancements to traditional darkroom adjustments, which are generally acceptable when they do not mislead. Examples include:
- Brightening a dark but naturally well-lit room
- Correcting yellow or blue color casts from mixed lighting
- Straightening vertical walls and door frames
- Cropping out temporary clutter at the edge of the frame, when not misleading
- Removing a temporary trash can from the driveway, since it is not a permanent condition
- Minor lawn color correction from harsh lighting, as long as it does not hide dead or damaged landscaping
- Reducing lens distortion so the room looks more accurate
- Improving sharpness or contrast for web display
- Reordering photos to improve the buyer's understanding of the home
Even minor edits can become risky if they change how a buyer understands condition, location, size, or included features.
Potentially Risky Edits
NAR's legal guidance and New York DOS guidance both flag manipulations that cross into misrepresentation. Examples include:
- Removing power lines, neighboring buildings, utility poles, busy roads, or obstructions
- Hiding water stains, cracks, damaged flooring, roof issues, mold-like staining, or deferred maintenance
- Replacing worn carpet with digital hardwood
- Making laminate counters appear like stone
- Adding a fireplace, pool, fence, furniture, appliances, landscaping, or view that does not exist
- Making a room appear wider or taller
- Removing signs of proximity to commercial uses or infrastructure
- Changing the sky or lighting so dramatically that the exterior looks unrealistic
- Virtually renovating a kitchen or bath without clear labeling
- Editing out accessibility limitations or property constraints
- Using AI-generated lifestyle images that imply discriminatory preferences
Building an Office or Team Policy
AI photo direction should not vary agent by agent. Written standards reduce risk, set seller expectations, and create consistency across listings. NAR's broker supervision resources note that brokers are responsible for supervising advertising and technology use, including image editing, and recommend written office policies to manage that risk.
Written Standards
A clear policy should define:
- Approved uses of AI photo assistance
- Prohibited edits
- Edits that require broker, seller, or compliance approval
- Required disclosures and labels for virtual staging or altered images
- How original and edited files are stored
- Who approves final images before MLS upload
- How long files are retained
- How vendors must identify AI-edited or virtually staged images
- How agents handle seller requests for misleading edits
- An escalation process for questionable images
- Fair Housing review expectations
- MLS-specific requirements by market
NAR's office policy guidance recommends written policies for advertising review and document retention, and many MLSs require subscribers to retain original photos and comply with content standards.
Training and Review
Support the policy with ongoing education. NAR encourages continuing training on technology and ethics, including AI use. Build in:
- Annual or semiannual training for agents and admins
- Onboarding guidance for new listing coordinators and preferred photographers
- Examples of acceptable and unacceptable edits
- Reviews of MLS updates and state advertising guidance
- Fair Housing refreshers focused on imagery, not just listing copy
- Random audits of listing media for compliance and consistency
- A shared checklist for photo approval before publication
HUD's Fair Housing training resources reinforce the value of regularly reviewing marketing materials for bias or discriminatory impact.
Quick Workflow for Your Next Listing
NAR's listing checklists break the process into pre-listing consultation, preparation, photography, marketing, and review. Use this repeatable sequence and add AI at the right steps:
- During the listing appointment, identify the home's top selling points, likely buyer questions, and visual challenges.
- Review MLS, brokerage, and state rules that affect photography, virtual staging, captions, and editing.
- Use AI to generate a seller prep checklist customized to the property.
- Walk the property and mark must-have shots, potential objections, and features to capture.
- Send the photographer a written brief with property positioning, shot priorities, and editing boundaries.
- Prepare the home physically before the shoot rather than relying on edits later.
- Attend or stay available during the shoot to answer questions and confirm key shots.
- Review proofs for completeness, accuracy, distortion, lighting, and missing features.
- Use AI to identify duplicates, sequence the gallery, and flag potential quality issues.
- Approve only edits that improve clarity without changing material facts.
- Label virtually staged or altered images according to MLS, brokerage, and legal requirements.
- Save original and edited images with notes on approvals.
- Publish a consistent image set across the MLS and all marketing channels.
- Revisit the gallery if showing feedback suggests confusion, missing information, or mismatched expectations.
Conclusion: Use AI to Improve Clarity, Not Create Fiction
AI can help you create stronger, cleaner, more consistent listing galleries. The best use of these tools is not to make a property look better than it is, but to help buyers understand the home faster and more accurately.
Professional photography, seller preparation, agent judgment, MLS compliance, and truthful advertising still matter. HUD and state regulators consistently reiterate that real estate advertising must be accurate and non-deceptive, regardless of the technology used, and NAR's position is that AI should enhance clarity rather than fabricate it. A clear photo workflow builds buyer trust, reduces surprises at showings, and supports a more professional listing launch.
Before your next listing goes live, create a written photo brief, review your MLS and brokerage rules, and use a simple approval checklist so every image supports an accurate, buyer-friendly presentation.
Sources
- NAR Profile of Home Buyers and Sellers Highlights
- NAR Artificial Intelligence and Real Estate
- NAR Artificial Intelligence in Real Estate
- NAR Code of Ethics
- NAR Digital Imagery Ethics in the Age of Technology
- NAR Digital Photo Manipulation: What Are the Risks?
- NAR Profile of Home Staging
- NAR Fair Housing
- NAR Broker Supervision
- NAR Office Policy Manuals
- NAR Center for REALTOR Development
- HUD Fair Housing Act Overview
- HUD Advertising Guidelines
- HUD Fair Housing Training
- New York Department of State Virtual Staging Guidance
- Texas Real Estate Commission
- RESO Data Dictionary
- Fannie Mae Selling Guide
- Redfin Professional Photos Study
- Redfin Listing Photos Analysis
- Zillow Group Listing Photo Research
- Zillow Group Photo Engagement Research
Frequently asked questions
Save the original files, the edited versions, and a short change log (what was altered and why) for each image. Store vendor invoices, the photographer’s brief, and final approvals in the same folder so you can show your review process. Keep labeled versions of any virtually staged or materially altered images. Retention periods and disclosure rules can vary by MLS and state, so confirm local requirements.
Set expectations with a written photo policy that bans edits which change condition, features, or surroundings. Offer compliant alternatives: repair before shooting, reschedule for better light, recompose the angle, add clarifying captions, or use approved virtual staging with labels. Explain that misleading imagery can trigger complaints and derail deals. If the request persists, escalate to your broker and document your recommendation.
Standardize bulbs to the same color temperature before the shoot and turn on all fixtures to reduce mixed casts. Place a neutral gray reference card in one frame per room so you can sync white balance in post. Batch-adjust exposure and white balance across similar rooms, then spot-check on both a phone and a calibrated monitor. If a room still reads off, correct locally instead of boosting saturation globally.
Removing temporary items is generally lower risk, but rules differ by MLS and brokerage. Never delete objects if doing so hides damage, size constraints, or nearby structures. Keep the originals and note that temporary items were removed; when in doubt, add a caption such as “Digitally adjusted to remove temporary objects.” If your MLS requires labels for any alteration, follow that standard.
Use “Virtually Staged” when you add furniture or decor for scale and flow; use “Virtual Renovation” (or similar) when finishes, fixtures, or landscaping are changed. Place the label on the image or in the first line of the caption and, where allowed, include the unstaged/original photo next to it. Make sure the labels carry through to syndication and social posts. Requirements vary by market and MLS, so verify local rules.
Avoid extreme ultra‑wide focal lengths and keep verticals straight so height and width aren’t stretched. Include at least one angle per room that shows true depth and connections to adjacent spaces. When permitted, add a floor plan or measured sketch to anchor scale. If a room is tight, prioritize clarity over coverage rather than pushing an unrealistic perspective.
First, verify windows and exteriors for swapped skies or views that don’t match street or map context. Compare paint, cabinet, and flooring tones to actual samples or your notes; look for HDR halos, unnaturally bright interiors, or glowing fireplaces. Confirm every major room is included and that any virtual changes are clearly labeled. If anything feels off, request the originals and ask the editor to show their adjustment history.
Create a one‑page brief with top features, buyer concerns, and a short “allowed vs. prohibited edits” list for the photographer. Generate a room‑by‑room prep checklist focused on the first 10 photos you’ll lead with. After the shoot, auto‑dedupe, batch-straighten, and normalize white balance, then manually review the hero set for accuracy and labels. Save originals, staged versions, and approvals in one dated folder for fast retrieval.